> For the complete documentation index, see [llms.txt](https://inventables.gitbook.io/x-carve-assembly/llms.txt). Markdown versions of documentation pages are available by appending `.md` to page URLs; this page is available as [Markdown](https://inventables.gitbook.io/x-carve-assembly/dust-control-system-optional.md).
# Dust Control System (Optional)

These instructions will take you through the installation of the [X-Carve Dust Control System](https://www.inventables.com/technologies/x-carve-dust-control-system) on your X-Carve 3D carving machine. This system comes with an easily detachable dust boot and self-contained hose management system.
## Inventory
### Tools Required
* 4mm Hex Key
* 3mm Hex Key
* 2mm Hex Key
* 8mm Wrench
* 10mm Wrench
### Overview of Parts
In your box, you will find a number of larger parts as well as a smaller box of hardware. You’ll want to look for the following:
**Conductive Hose**
This connects the dust shoe to the vacuum. It is conductive and will dissipate static buildup when properly grounded.

**Hose Support Poles**
These poles fit together to suspend the hose assembly over the machine. The straight pole is the bottom pole and the pole with the two 45º bends fits on top.

**Pole Support Bracket**
This bracket mounts onto the right-front makerslide end plate on your machine and holds the bottom pole in place

**Hose Clips**
These mount on the hose support poles to hold the hose in place. Three mount on the top pole and two mount on the bottom pole. The threaded hole in each clip accepts a M5x8mm socket head cap screw to hold it in place. These screws are located in the Support Assembly Hardware Kit.

**Support Assembly Kit**
This hardware kit includes the necessary components to attach the pole support and the hose clips. It includes:
* M5x8mm Socket Head Cap Screws (5x)
* M5x12mm Button Head Cap Screw (1x)
* M5x16mm Button Head Cap Screw (1x)

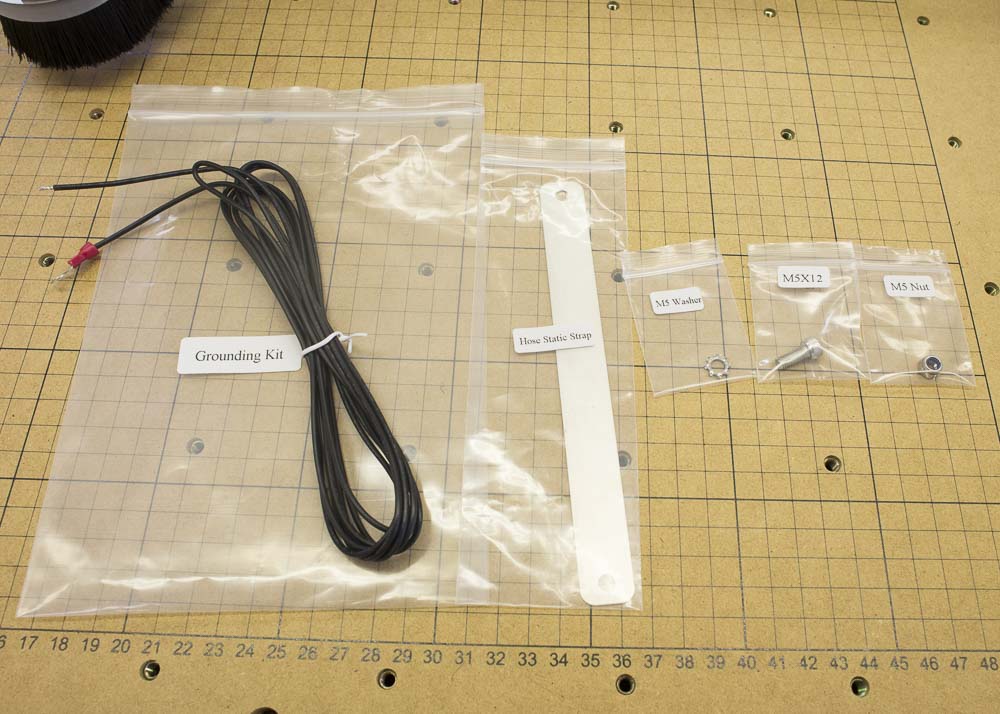
**Grounding Kit**
To prevent build-up of static during dust collection, your kit includes a grounding strap and the hardware to install it. This fits around the included hose which is conductive. This bag should include:
* Hose Static Strap (1x)
* Ground Wire Cable Assembly (1x)
* Stainless Steel M5 Lock Washer (1x)
* M5 Nylon Locking Nut (1x)
* M5x12mm Stainless Steel Socket Head Cap Screw (1x)

**Dust Shoe and Hose adapter**
These attach to either end of the hose. The hose fitting on the dust shoe is glued onto the clear plastic body and is not removable. The hose adapter (right) press-fits onto the vacuum side of the hose.

 **Dust Shoe Support Arms**
These support arms hold the dust shoe in place when in use. The channels with embedded magnets serve to lock the dust shoe in place.

**Spindle Insert Plate**
These replaceable inserts fit into the dust shoe to improve the vacuum seal of the assembly. They are pictured here with their removable plastic backing. We have included a spare insert in your kit, though only one is necessary for assembly.

**Dust Shoe Hardware Kit**
This kit includes the hardware necessary to attach the dust shoe supports to your machine. It should include the following hardware:
* M5x8mm Button Head Cap Screws (4x)
* M3x8mm Button Head Cap Screws (4x)
* T-Slot Nuts (4x)
* Clamp Thumb Screws (2x)

## Build Instructions
### Install Dust Shoe Arms
Locate the two dust shoe arms as well as the clamp screws that go with them. Note that these are mirrored parts and not interchangeable with one another. Note the small magnets on the bottom slot of each arm. These align with the magnets in the dust shoe and help to keep it in place.

Thread in the clamp screws into each arm. Thread them far enough in that the end of the screw almost comes through the other side of the threaded hole. This will make them easier to install.

Slide both arms into the slots on the brackets. Make sure that the channels in each arm are facing each other.

Secure each arm with the included clamping screw until snug


{% hint style="info" %}
If stripped during assembly, you can find additional Upgrade Dust Shoe Knobs in the Spare Parts Kit.
{% endhint %}
### Install Spindle Insert Plate
For your dust shoe to operate properly, you will need to install a small plastic insert on the underside to maintain the proper suction during cutting. This is designed to be replaceable so that damage from the bit, collisions, etc. is relatively limited. Begin by peeling the protective backing off of each side of the insert.


Now remove the protective film from the dust shoe itself.

Using four M3x8mm button head cap screws and a 2mm hex key, secure the insert to the shoe. The holes for the screws are already drilled and tapped. Take care to avoid cross-threading or stripping the holes.


Adjust the arm height as necessary then slide the dust shoe onto the slots in the two support arms. If the dust shoe doesn’t slide in easily, try loosening one of the arms slightly then tightening it when once the dust shoe is inserted. You’ll attach the hose to the fitting in a later step.


{% hint style="info" %}
Spindle Insert Plate can break during use. If that occurs, there is an additional Spindle Insert Plate in the dust control kit along with one in the Spare Parts Kit
{% endhint %}
### Install Hose Support Pole
To suspend the vacuum hose, you’ll need to install the support pole on the lower right corner of the machine. Begin by locating the pole mounting bracket, along with two M5 x 14mm socket head screws and one M5 Nylock Nut from the Z Axis Upgrade Kit.

Use a 4mm hex key to remove the bottom right screw on the lower-right makerslide end plate.

Align the bracket with the holes on the makerslide end plate.

Secure the bottom part of the bracket with an M5x14mm socket head screw. You may have to re-align the t-slot nut for the bottom screw.

Secure the top part of the bracket with another M5x14mm socket head screw, this time with an M5 nylock nut on the back.


Now you can set up the support pole itself. First, Locate the two poles that make up the support arm.

Locate the five hooks that mount onto the poles and the five M5x8mm socket head cap screws that hold them in place. The screws thread into the hole on each hook to secure the hooks to the poles.

Install one hook onto the straight section of the pole as shown below. Use a 4mm hex key to secure the hook in the middle of the pole section.

Locate the angled pole and the four remaining hooks. Arrange the hooks as shown.

Insert the straight section of the pole into the bracket so that the tapered section is pointing up. The pole should be free to turn in the bracket so that it can swing back and forth during use. Install the bent pole on top of the straight section as shown.

Attach the dust shoe to one end of the hose, and the hose adapter to the other. The dust shoe fitting has a left-hand thread, so it’s a “lefty-tighty” configuration. The adapter is a simple press-fit.
Clip the hose in place so that the dust shoe has a free range of motion across the entire area of the bed.

The dust hose attaches to four of the clamps on the pole. The fifth hook is for storing the dust boot when it is not in use.

### Install Static Dissipating Band
The plastic hose included with your kit is made of a conductive plastic designed to dissipate static charge built up from material moving through the hose. We recommend grounding the hose to reduce the risk of electrostatic discharge, which can start fires and damage electronics. We include a grounding wire with an aluminum band which can be connected to an electrical ground connection, outlet cover screw, or cold water pipe. First, locate the grounding wire, band, bolt with washer, and nut.\
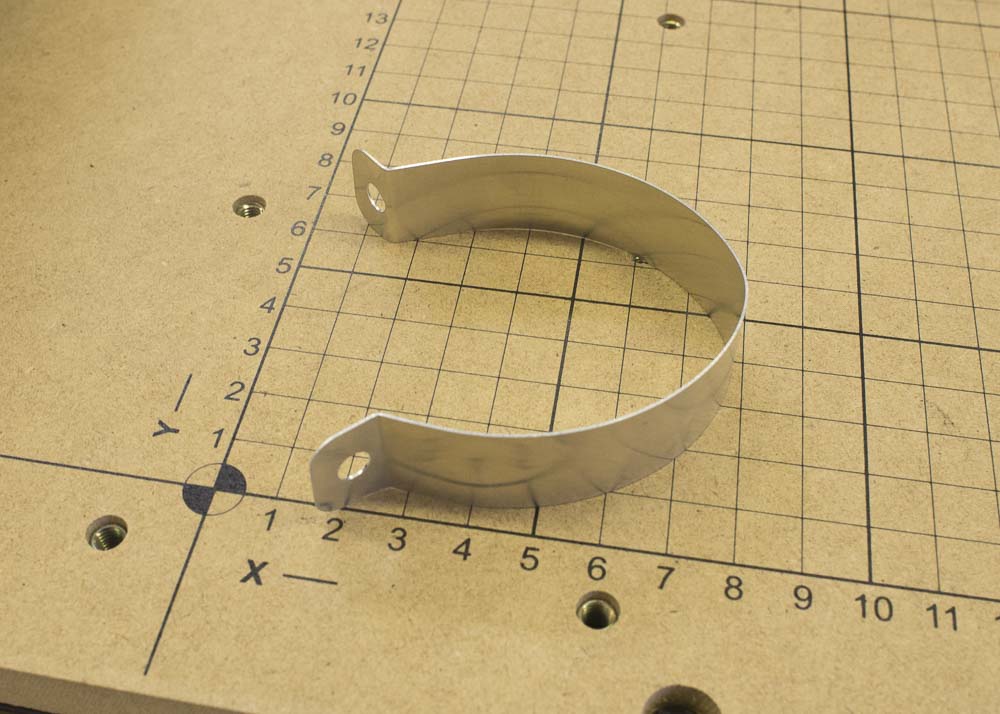
Pre-form the aluminum strap as pictured below. This can be done using the edge of your wasteboard.
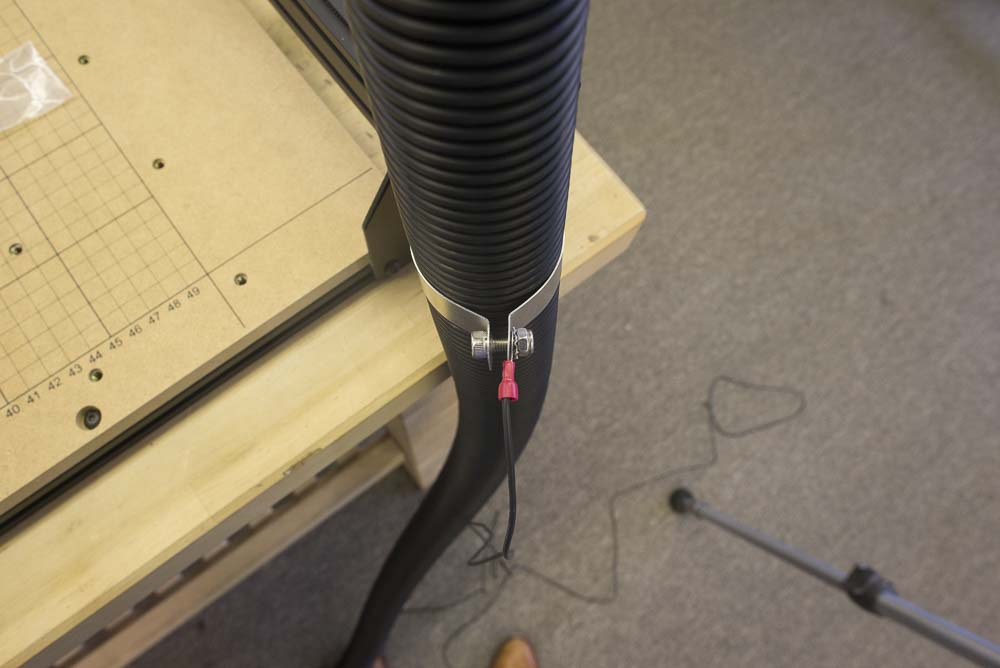
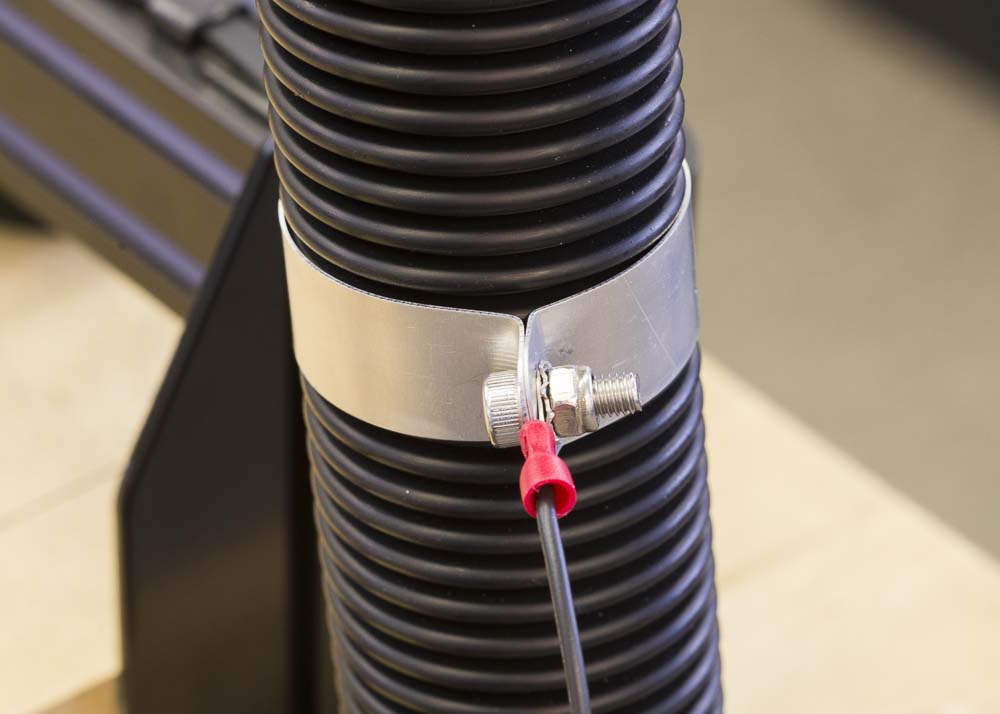
Bend the aluminum strap around the hose. Insert the bolt through the round connector on the grounding wire, then insert it through both holes on the aluminum band. Use the washer and nut to secure the band in place. Once the band is installed, you can attach the other end of the wire to a ground connection like a switch plate cover screw or cold water pipe.
## Setup and Usage
Now that you have the dust shoe and hose installed, it’s time to set up your workspace and run a job.
### Attach Hose to Vacuum
With the adapter installed, attach the end of the dust collection hose to your vacuum. This is a standard connection so most any standard Shop-Vac-style connection. If you haven’t done so already, make sure that the wire from the aluminum grounding strap has been attached to a outlet cover screw, cold water pipe, or other electrical earth.
### Easel Setup
If you’ll be using Easel for carving, you’ll want to take your machine through the [setup](http://easel.inventables.com/setup) process again to add the dust collection system to the carve dialog. First, connect your machine and open up Easel. Go to ‘Machine->Set up your machine’
Make sure that you check the box marked ‘Dust shoe’ on the initial setup page.
You can then proceed through the machine setup normally.
When you go to carve, you’ll be presented with a prompt just before turning on the spindle to attach the dust shoe.
The process for setting up your job for a carve with the dust collection system is covered below. You will be prompted to do these steps when you click ‘Carve’ in Easel.
### Clamp Your Material
Start with your dust shoe detached and secured out of the way. Choose a convenient spot on your wasteboard to mount your material. You can use double-sided tape or step-clamps to hold the material down. Double-sided tape is ideal for working with the dust collection system as you don’t have to worry about the dust shoe hitting clamps. If you’re using step clamps, you’ll want to make sure that they don’t protrude too far above the top of the material to avoid collisions.
The [Clamp Set for 3D Carving](https://www.inventables.com/technologies/clamp-set-for-3d-carving) comes with a number of step block and bolt sizes. Choose the shortest possible clamp for your material.
### Insert Bit
The dust shoe will make the the collet nut inaccessible, so it’s necessary to install the bit before sliding the shoe into place. Take care not to hit the dust shoe arms on either side of the spindle when securing the bit.
### Insert and Adjust Dust Shoe
First, loosen the clamp screws on both dust shoe arms and raise them to the top of their slots. Insert the dust shoe into the slots at the bottom of the arms and ensure that it ‘clicks’ into place with the embedded magnets. If you’re having trouble inserting the dust shoe, try loosening one of the dust shoe arms, inserting the dust shoe, then re-tightening the arm.
You can now adjust the height of the dust shoe relative to the top of the material to be cut and the clamps if you’re using them. You’ll want to make sure that the brush is touching the top of the material or is as close as possible. More importantly, you’ll want to make sure that the acrylic shoe clears the tops of any clamps you have installed. It’s okay if the brush touches the clamps during the course of a carve. You can check this clearance by visual inspection of the work area, or jogging the spindle over the tallest clamp and physically checking the clearance of the shoe.
Before securing the clamp arms, use the scales on either side of the arm mounting brackets to make sure that both sides are roughly at the same height. Use the green clamp screws to secure the arms in place.
You can now turn your vacuum on and run your carve.
**Dust Shoe Support Arms**
These support arms hold the dust shoe in place when in use. The channels with embedded magnets serve to lock the dust shoe in place.

**Spindle Insert Plate**
These replaceable inserts fit into the dust shoe to improve the vacuum seal of the assembly. They are pictured here with their removable plastic backing. We have included a spare insert in your kit, though only one is necessary for assembly.

**Dust Shoe Hardware Kit**
This kit includes the hardware necessary to attach the dust shoe supports to your machine. It should include the following hardware:
* M5x8mm Button Head Cap Screws (4x)
* M3x8mm Button Head Cap Screws (4x)
* T-Slot Nuts (4x)
* Clamp Thumb Screws (2x)

## Build Instructions
### Install Dust Shoe Arms
Locate the two dust shoe arms as well as the clamp screws that go with them. Note that these are mirrored parts and not interchangeable with one another. Note the small magnets on the bottom slot of each arm. These align with the magnets in the dust shoe and help to keep it in place.

Thread in the clamp screws into each arm. Thread them far enough in that the end of the screw almost comes through the other side of the threaded hole. This will make them easier to install.

Slide both arms into the slots on the brackets. Make sure that the channels in each arm are facing each other.

Secure each arm with the included clamping screw until snug


{% hint style="info" %}
If stripped during assembly, you can find additional Upgrade Dust Shoe Knobs in the Spare Parts Kit.
{% endhint %}
### Install Spindle Insert Plate
For your dust shoe to operate properly, you will need to install a small plastic insert on the underside to maintain the proper suction during cutting. This is designed to be replaceable so that damage from the bit, collisions, etc. is relatively limited. Begin by peeling the protective backing off of each side of the insert.


Now remove the protective film from the dust shoe itself.

Using four M3x8mm button head cap screws and a 2mm hex key, secure the insert to the shoe. The holes for the screws are already drilled and tapped. Take care to avoid cross-threading or stripping the holes.


Adjust the arm height as necessary then slide the dust shoe onto the slots in the two support arms. If the dust shoe doesn’t slide in easily, try loosening one of the arms slightly then tightening it when once the dust shoe is inserted. You’ll attach the hose to the fitting in a later step.


{% hint style="info" %}
Spindle Insert Plate can break during use. If that occurs, there is an additional Spindle Insert Plate in the dust control kit along with one in the Spare Parts Kit
{% endhint %}
### Install Hose Support Pole
To suspend the vacuum hose, you’ll need to install the support pole on the lower right corner of the machine. Begin by locating the pole mounting bracket, along with two M5 x 14mm socket head screws and one M5 Nylock Nut from the Z Axis Upgrade Kit.

Use a 4mm hex key to remove the bottom right screw on the lower-right makerslide end plate.

Align the bracket with the holes on the makerslide end plate.

Secure the bottom part of the bracket with an M5x14mm socket head screw. You may have to re-align the t-slot nut for the bottom screw.

Secure the top part of the bracket with another M5x14mm socket head screw, this time with an M5 nylock nut on the back.


Now you can set up the support pole itself. First, Locate the two poles that make up the support arm.

Locate the five hooks that mount onto the poles and the five M5x8mm socket head cap screws that hold them in place. The screws thread into the hole on each hook to secure the hooks to the poles.

Install one hook onto the straight section of the pole as shown below. Use a 4mm hex key to secure the hook in the middle of the pole section.

Locate the angled pole and the four remaining hooks. Arrange the hooks as shown.

Insert the straight section of the pole into the bracket so that the tapered section is pointing up. The pole should be free to turn in the bracket so that it can swing back and forth during use. Install the bent pole on top of the straight section as shown.

Attach the dust shoe to one end of the hose, and the hose adapter to the other. The dust shoe fitting has a left-hand thread, so it’s a “lefty-tighty” configuration. The adapter is a simple press-fit.
Clip the hose in place so that the dust shoe has a free range of motion across the entire area of the bed.

The dust hose attaches to four of the clamps on the pole. The fifth hook is for storing the dust boot when it is not in use.

### Install Static Dissipating Band
The plastic hose included with your kit is made of a conductive plastic designed to dissipate static charge built up from material moving through the hose. We recommend grounding the hose to reduce the risk of electrostatic discharge, which can start fires and damage electronics. We include a grounding wire with an aluminum band which can be connected to an electrical ground connection, outlet cover screw, or cold water pipe. First, locate the grounding wire, band, bolt with washer, and nut.\

Pre-form the aluminum strap as pictured below. This can be done using the edge of your wasteboard.

Bend the aluminum strap around the hose. Insert the bolt through the round connector on the grounding wire, then insert it through both holes on the aluminum band. Use the washer and nut to secure the band in place. Once the band is installed, you can attach the other end of the wire to a ground connection like a switch plate cover screw or cold water pipe.
 
## Setup and Usage
Now that you have the dust shoe and hose installed, it’s time to set up your workspace and run a job.
### Attach Hose to Vacuum
With the adapter installed, attach the end of the dust collection hose to your vacuum. This is a standard connection so most any standard Shop-Vac-style connection. If you haven’t done so already, make sure that the wire from the aluminum grounding strap has been attached to a outlet cover screw, cold water pipe, or other electrical earth.
### Easel Setup
If you’ll be using Easel for carving, you’ll want to take your machine through the [setup](http://easel.inventables.com/setup) process again to add the dust collection system to the carve dialog. First, connect your machine and open up Easel. Go to ‘Machine->Set up your machine’
Make sure that you check the box marked ‘Dust shoe’ on the initial setup page.
You can then proceed through the machine setup normally.
When you go to carve, you’ll be presented with a prompt just before turning on the spindle to attach the dust shoe.
The process for setting up your job for a carve with the dust collection system is covered below. You will be prompted to do these steps when you click ‘Carve’ in Easel.
### Clamp Your Material
Start with your dust shoe detached and secured out of the way. Choose a convenient spot on your wasteboard to mount your material. You can use double-sided tape or step-clamps to hold the material down. Double-sided tape is ideal for working with the dust collection system as you don’t have to worry about the dust shoe hitting clamps. If you’re using step clamps, you’ll want to make sure that they don’t protrude too far above the top of the material to avoid collisions.
The [Clamp Set for 3D Carving](https://www.inventables.com/technologies/clamp-set-for-3d-carving) comes with a number of step block and bolt sizes. Choose the shortest possible clamp for your material.
### Insert Bit
The dust shoe will make the the collet nut inaccessible, so it’s necessary to install the bit before sliding the shoe into place. Take care not to hit the dust shoe arms on either side of the spindle when securing the bit.
### Insert and Adjust Dust Shoe
First, loosen the clamp screws on both dust shoe arms and raise them to the top of their slots. Insert the dust shoe into the slots at the bottom of the arms and ensure that it ‘clicks’ into place with the embedded magnets. If you’re having trouble inserting the dust shoe, try loosening one of the dust shoe arms, inserting the dust shoe, then re-tightening the arm.
You can now adjust the height of the dust shoe relative to the top of the material to be cut and the clamps if you’re using them. You’ll want to make sure that the brush is touching the top of the material or is as close as possible. More importantly, you’ll want to make sure that the acrylic shoe clears the tops of any clamps you have installed. It’s okay if the brush touches the clamps during the course of a carve. You can check this clearance by visual inspection of the work area, or jogging the spindle over the tallest clamp and physically checking the clearance of the shoe.
Before securing the clamp arms, use the scales on either side of the arm mounting brackets to make sure that both sides are roughly at the same height. Use the green clamp screws to secure the arms in place.
You can now turn your vacuum on and run your carve.